By: Team AY1920S1-CS2103T-W12-3 Since: Sep 2019 Licence: MIT
- 1. Introduction
- 2. Setting up
- 3. Design
- 4. Implementation
- 4.1. Transaction:
in/out - 4.2. Set Budget Feature:
set - 4.3. Split Feature:
split - 4.4. Settle Up Feature:
receive - 4.5. Project Feature:
project - 4.6. Display Feature:
display - 4.7. View Feature:
view - 4.8. Delete Transaction Feature:
delete - 4.9. Update Existing Entry Feature:
update - 4.10. Sort Feature:
sort - 4.11. Filter Feature:
filter - 4.12. Undo / Redo Command Feature:
undo/redo - 4.13. Logging
- 4.14. Configuration
- 4.1. Transaction:
- 5. Documentation
- 6. Testing
- 7. Dev Ops
- Appendix A: Product Scope
- Appendix B: User Stories
- Appendix C: Use Cases
- Appendix D: Non Functional Requirements
- Appendix E: Glossary
- Appendix F: Instructions for Manual Testing
- F.1. Launch and Shutdown
- F.2. Adding an In Transaction
- F.3. Adding an Out Transaction
- F.4. Adding a Budget
- F.5. Adding a Split Ledger
- F.6. Adding a Receive Ledger
- F.7. Switching Tabs
- F.8. Deleting an Entry
- F.9. Updating an Entry
- F.10. Sorting the Transactions
- F.11. Viewing Help Window
- F.12. Saving Data
1. Introduction
1.1. Purpose
This document describes the architecture and system design of PalPay. It is a living document that evolves throughout the design and implementation for each release. Each release will have an edition of the document, and the current edition of the document is for the first public release of the application.
This document aims to cover the high-level system architecture and design. It is segmented into two major parts: software design, including system architecture, and design implementation. The software design illustrates the main software components that operate and support the main system architecture. Essential details such as the user stories, use cases, and the Non Functional Requirements are included at the back of this document.
1.2. Audience
This document is written for software engineers who desires a deeper insight of the system architecture and design of this application - PalPay. In particular, the intended audience of this document will be the students taking on the roles of the developers, designers, and software testers of PalPay from CS2103T - Software Engineering.
1.3. Description
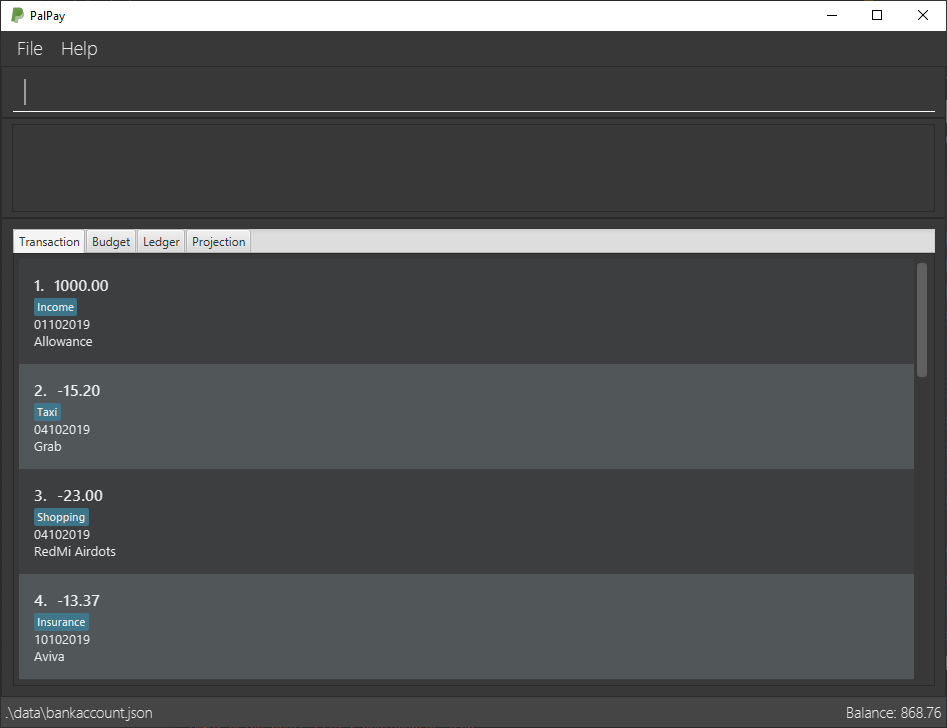
PalPay is a CLI application targeted for users who have poor financial management skills. The users should also prefer typing over mouse inputs. It allows the users to keep track of daily financial transactions, as well as set a budget for a time duration to achieve long-term financial success. Additionally, users can keep a ledger of lending and borrowing of money with others so that the users can keep track of the flow of their money.
Below is the Graphical User Interface (GUI) of PalPay:
2. Setting up
Refer to the guide here.
3. Design
3.1. Architecture
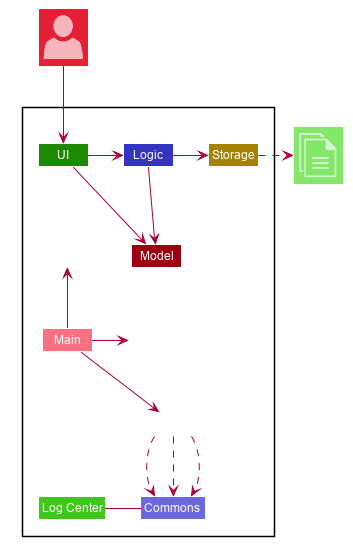
The Architecture Diagram given above explains the high-level design of the App. Given below is a quick overview of each component.
-
At app launch: Initializes the components in the correct sequence, and connects them up with each other.
-
At shut down: Shuts down the components and invokes cleanup method where necessary.
Commons represents a collection of classes used by multiple other components.
The following class plays an important role at the architecture level:
-
LogsCenter: Used by many classes to write log messages to the App’s log file.
The rest of the App consists of four components.
Each of the four components
-
Defines its API in an
interfacewith the same name as the Component. -
Exposes its functionality using a
{Component Name}Managerclass.
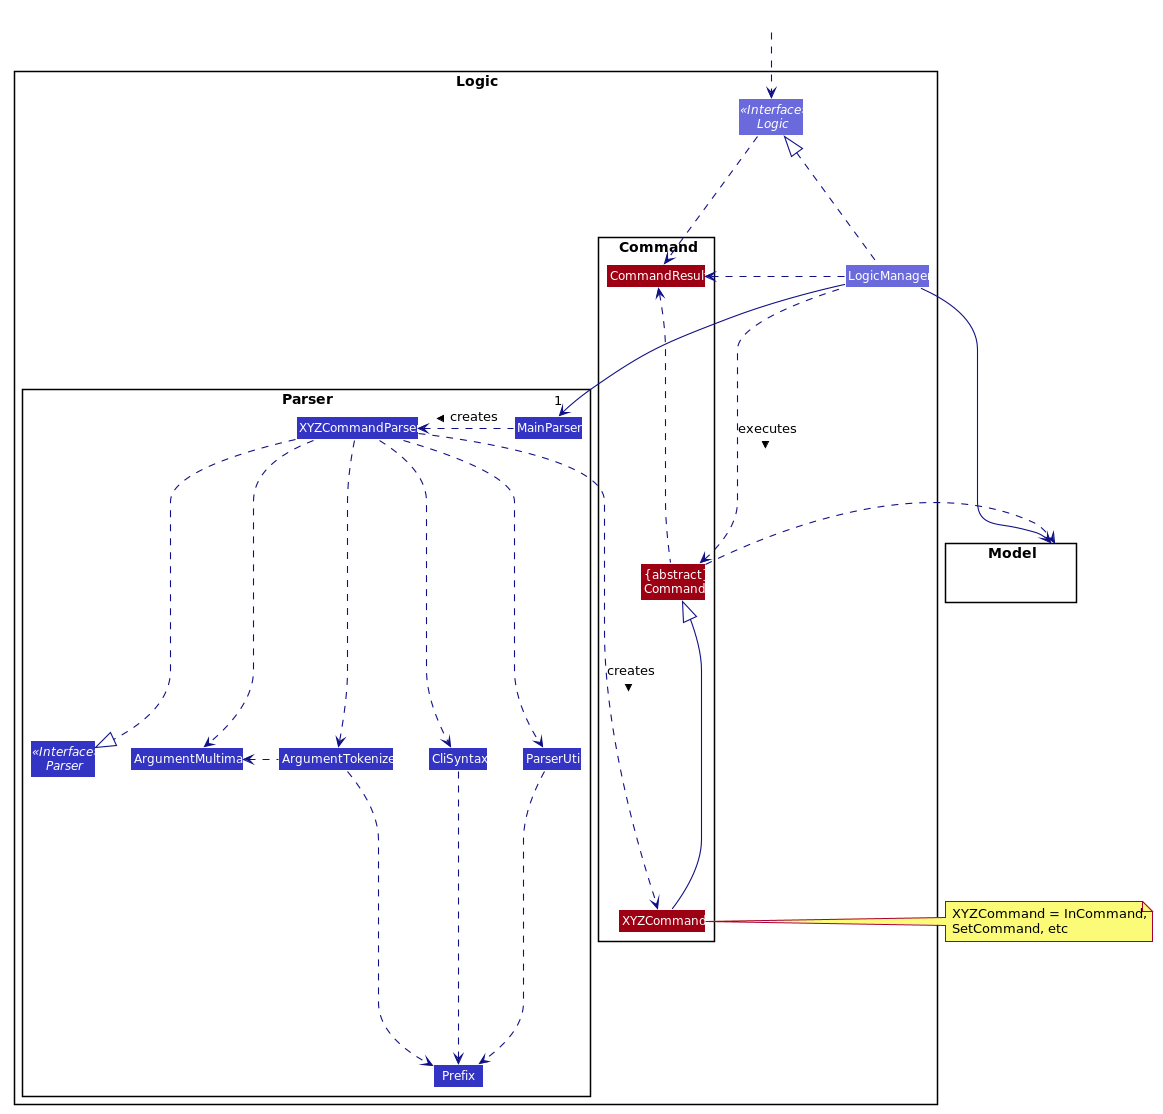
For example, the Logic component (see the class diagram given below) defines it’s API in the Logic.java interface and exposes its functionality using the LogicManager.java class.
How the architecture components interact with each other
The Sequence Diagram below shows how the components interact with each other for the scenario where the user issues the command delete 1.
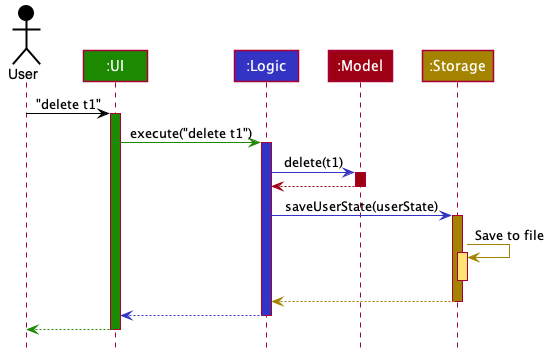
delete t1 CommandThe sections below give more details of each component.
3.2. UI Component
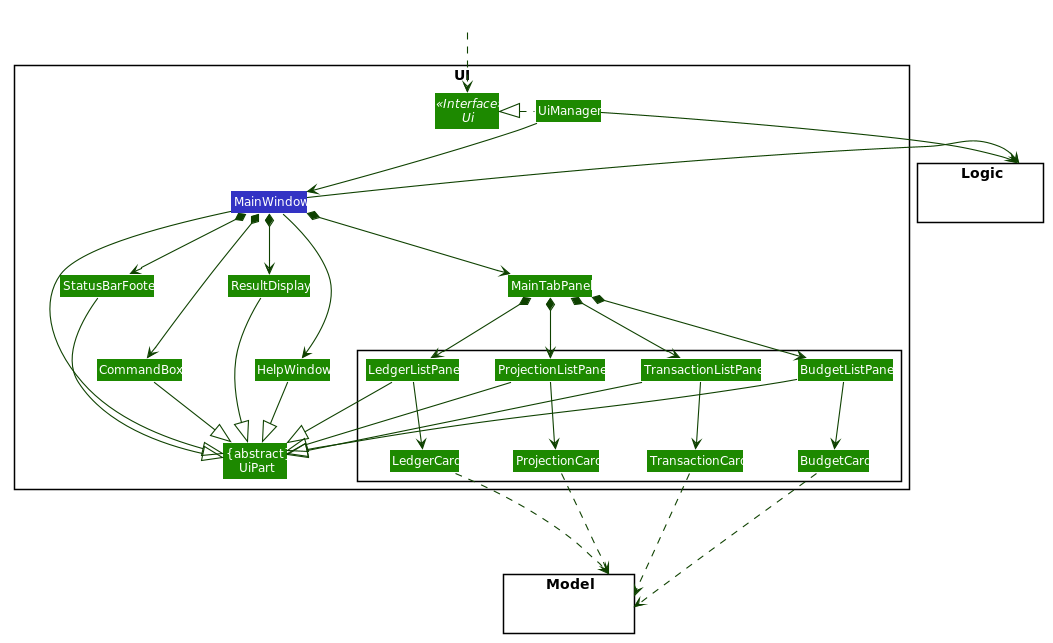
API : Ui.java
The UI consists of a MainWindow that is made up of parts e.g.CommandBox, ResultDisplay, PersonListPanel, StatusBarFooter etc.
All these, including the MainWindow, inherit from the abstract UiPart class.
The UI component uses JavaFx UI framework.
The layout of these UI parts are defined in matching .fxml files that are in the src/main/resources/view folder.
For example, the layout of the MainWindow is specified in MainWindow.fxml
The UI component,
-
Executes user commands using the
Logiccomponent. -
Listens for changes to
Modeldata so that the UI can be updated with the modified data.
3.3. Logic Component
API :
Logic.java
-
Logicuses theBankAccountParserclass to parse the user command. -
This results in a
Commandobject which is executed by theLogicManager. -
The command execution can affect the
Model(e.g. adding a transaction). -
The result of the command execution is encapsulated as a
CommandResultobject which is passed back to theUi. -
In addition, the
CommandResultobject can also instruct theUito perform certain actions, such as displaying help to the user.
Given below is the Sequence Diagram for interactions within the Logic component for the execute("delete t1") API call.
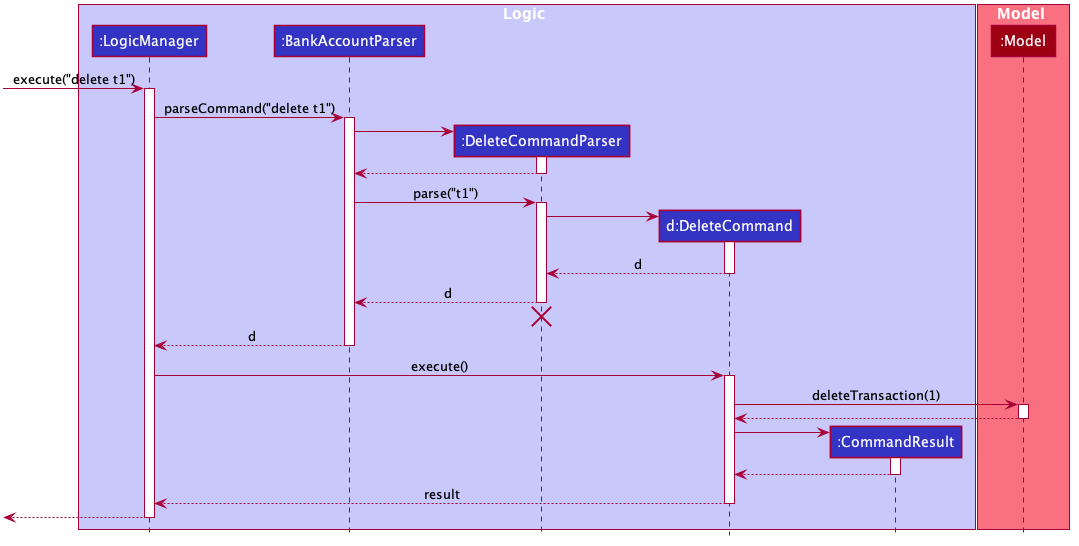
delete t1 Command
The lifeline for DeleteCommandParser should end at the destroy marker (X) but due to a limitation of PlantUML, the lifeline reaches the end of diagram.
|
3.4. Model Component
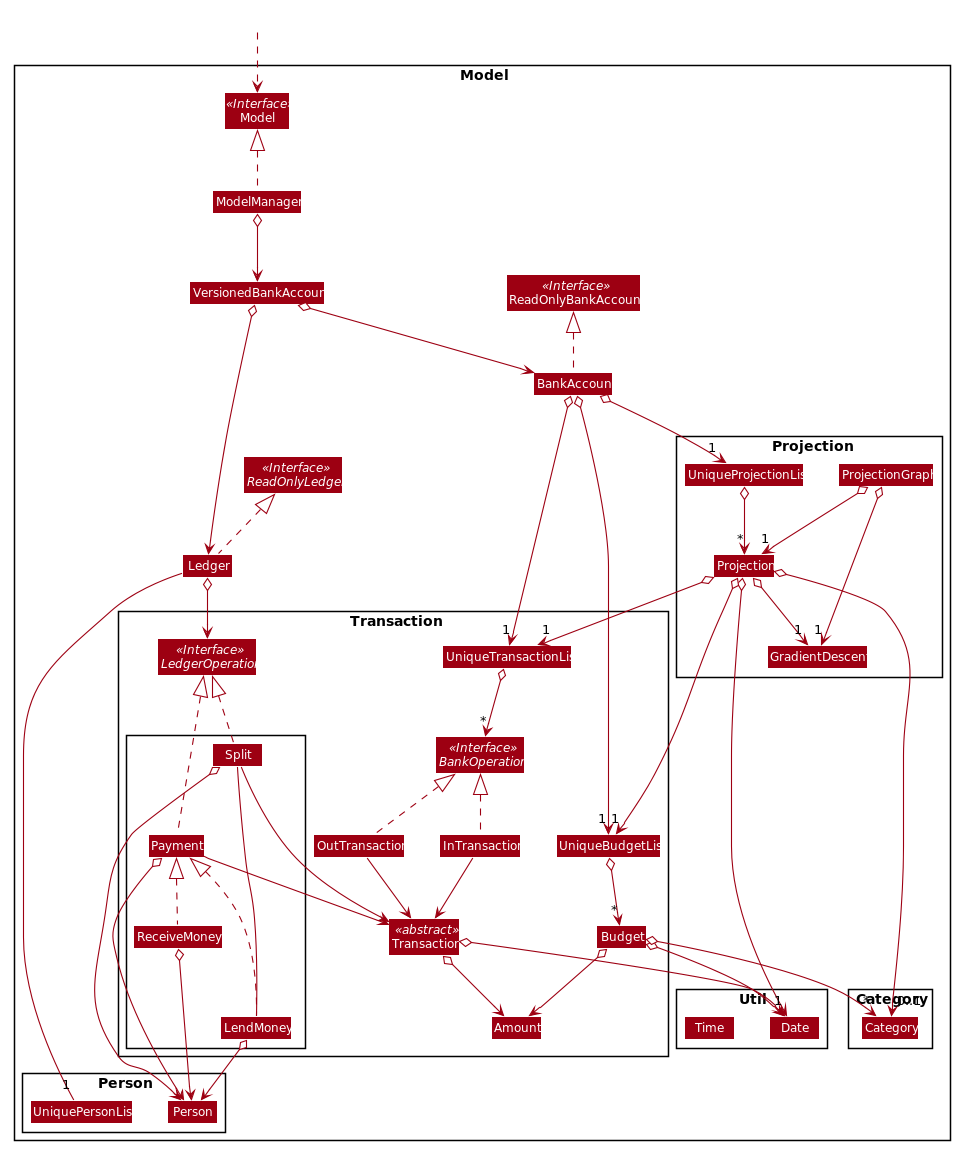
API : Model.java
The Model,
-
stores a
UserPrefobject that represents the user’s preferences. -
stores the User State data.
-
exposes an unmodifiable
ObservableList<BankAccountOperation>,ObservableList<Budget>,ObservableList<LedgerOperation>andObservableList<Projection>that can be 'observed'.
For example, the UI can be bound to these lists so that the UI automatically updates when the data in the lists change due to user commands. -
does not depend on any of the other three components.
3.5. Storage Component

API : Storage.java
The Storage component,
-
can save
UserPrefobjects in json format and read it back. -
can save the Bank Account data in json format and read it back.
3.6. Common Classes
Classes used by multiple components are in the seedu.addressbook.commons package.
4. Implementation
This section describes some noteworthy details on how certain features are implemented.
4.1. Transaction: in / out
The Transaction abstract class allows user to input income and expense statements. Both in and out transactions requires the mandatory Amount, Description and Date fields to be appended. There is an optional Category field which can accept one or more input depending on the user specifications.
The in transactions will increase the BankAccount balance amount whilst the out transactions will reduce the BankAccount balance amount.
In Transactions represent the income statements inputted into Palpay.
Out Transactions represent the expenditure statements inputted into Palpay.
4.1.1. Current Implementation
Given below is an example usage of how in behaves at each step. out command follows a similar logic flow.
Step 1. The user executes in $/200 n/coke d/10102019 to input a new income of $100 on 10th November 2019 under the category GENERAL.
Step 2. Upon executing the command, LogicManager uses MainParser#parse to parse this input from the user.
Step 3. MainParser determines which command is being executed and creates InCommandParser to further parse the input.
Step 4. InCommandParser parses the argument and checks the validity of arguments. If it is invalid, an exception is thrown.
Else, it returns a InCommand.
Step 5. LogicManager uses InCommand#execute() to add a new InTransaction.
Step 6. BankAccount then calls InTransaction#handleBalance() to increase its balance amount by $200.
Step 7. InCommand uses Model#commitUserState() to save the latest state of the application. It then
returns a CommandResult to the LogicManager and the result will be displayed to the user.
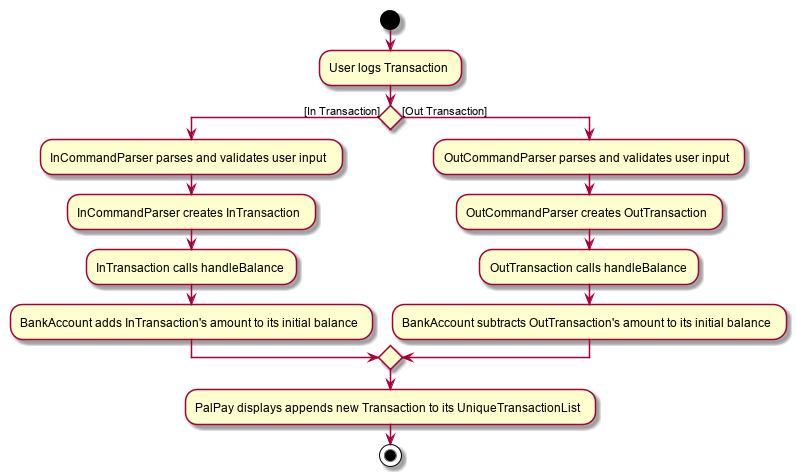
The sequence diagram below illustrates how PalPay handles the command input in $/200 n/coke d/10102019. The arguments are parsed into the logic component where the subsequent model objects are created.
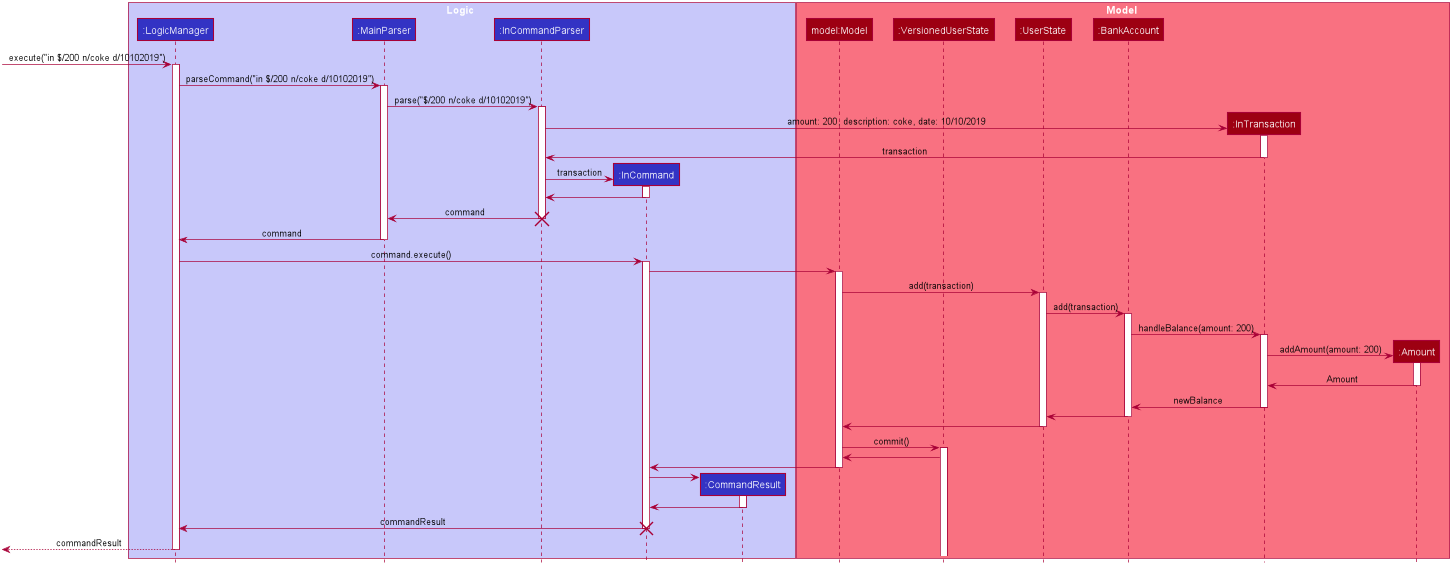
InCommandThe in and out transaction follows the same logic flow after they are parsed.
The difference between in and out transactions is that the handleBalance() method called in the BankAccount results in an addAmount operation for the inTransaction and a subtractAmount operation for the OutTransaction class.
Example
Given that the BankAccount balance initially starts with 0 dollars.
-
inTransaction of$1000will increase theBankAccountbalance from $0 to $1000. -
outTransaction of$250will subsequently decrease theBankAccountbalance from $1000 to $250. -
The Activity Diagram shown below will provide a visual representation of the two routes a Transaction object can take.
4.1.2. Design Considerations
-
To prevent repetitive code implementation, the
Transactionabstract class is used to facilitate income and expenditure logging.Transactionis an abstract class which contains the default constructor and commonly used variables.InTransactionandOutTransactionextends theTransactionclass as they typically store an amount, date, description, and a set of categories. A code snippet of theTransactionabstract class is shown below.
public abstract class Transaction {

    protected Amount amount;
    protected Date date;
    protected Description description;
    protected final Set<Category> categories = new HashSet<>();

    public Transaction(Amount amount, Date date, Description description) {
        this.amount = amount;
        this.date = date;
        this.description = description;
}-
The balance in
BankAccountand the balance inLedgerare considered two separate identities, both being encompassed under theUserStateclass. Therefore user operations that deal withBankAccountimplements theBankAccountOperationinterface, while operations that deal withLedgerimplements theLedgerOperationinterface.-
This allows us to achieve polymorphism by overloading methods in
Modelto handle the different operations correctly. -
This reduces code coupling as there are different models to handle different balance amounts.
-
-
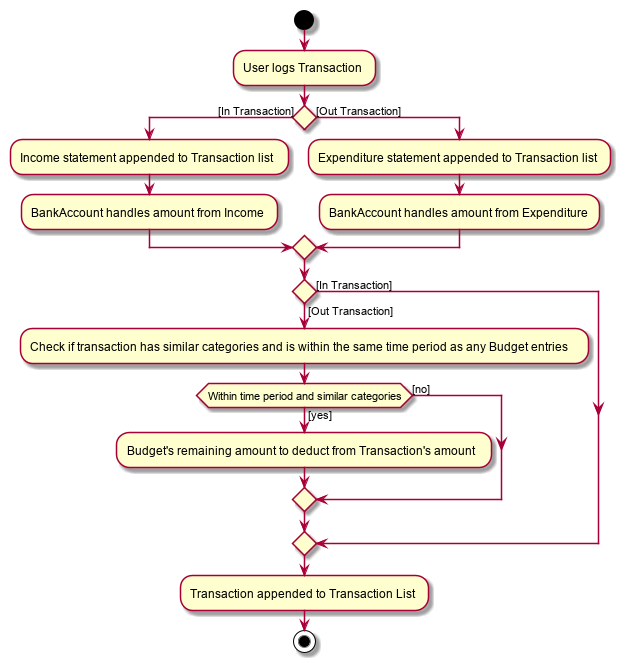
A
Transactionentry can affect aBudgetwhich has similar categories and is within the same time period. The activity diagram bellow will further clarify this flow.-
Only
OutTransactions can affectBudget. -
The activity diagram below shows how and when a
Transactionobject affectsBudget.
-
4.2. Set Budget Feature: set
The Budget class allows the user to set a budget for a given time period for a category, if specified.
The user is allowed to set multiple budgets, but duplicate budgets (budgets with the same identity in terms of amount, date and category) are not allowed.
Upon setting the budget, making OutTransaction will deduct the amount from relevant budgets in the list.
The detailed implementation of the process of updating the budget is explained further below in Current Implementation.
4.2.1. Current Implementation
The set command is an extension of parent Command class, facilitated by the Logic and Model components of the application, PalPay
Given an amount and date, a new Budget is set for the user.
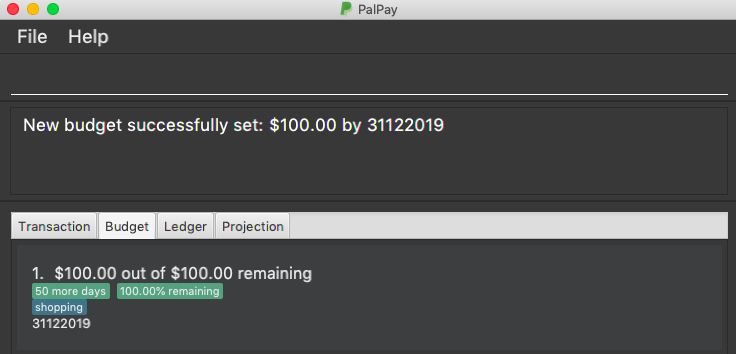
Upon setting a new budget, a BudgetCard is created and displayed in a list in the application window till the date set by the user.
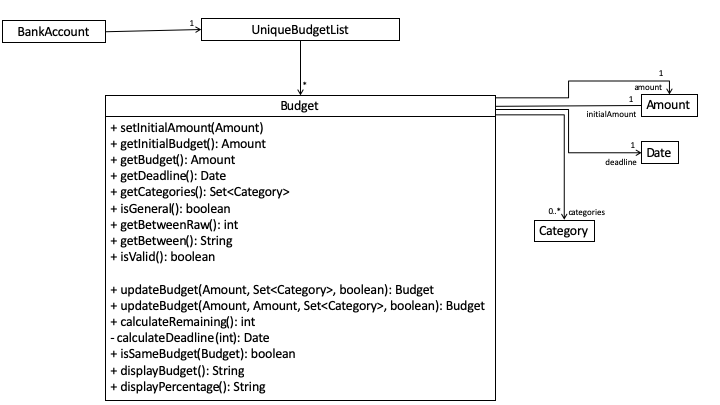
A Budget stores an initial amount, amount (the current amount), deadline, categories.
There is a need for a Budget to store both initial amount and amount as it allows for percentage of budget remaining to be calculated.
Shown below is the class diagram of Budget class:
Displaying the percentage remaining improves the user experience greatly as our target user is a
visual person who wants to see how much budget he has left in each category so as to cut down on spending as necessary
as specified in the User Story. Hence, taking a quick glance at the Budget card allows the user to
determine how much of budget he has left, as well as be alarmed by the red font color to spend less if he has overspent beyond the budget set.
A snippet of the code which calculates the percentage of budget left is shown below:
public String displayPercentage() {
double percentage = this.amount.divideAmount(this.initialAmount) * 100;
if (percentage < 0.00) {
percentage = 0.0; // should not display a negative percentage
} else if (percentage > 100.00) {
percentage = 100.0; // should not display a percentage greater than 100%
}
return String.format("%.2f%% remaining", percentage);
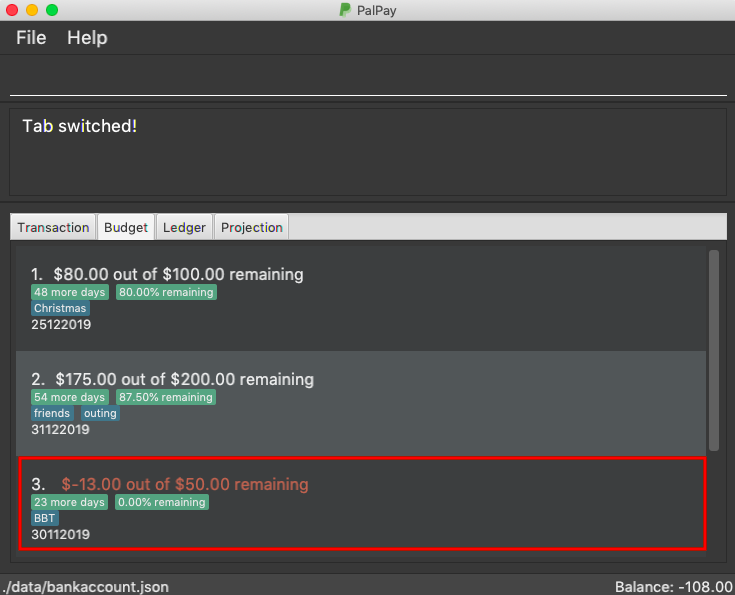
}Moreover, as our user is a visual person, PalPay makes use of color to display different messages.
For instance, budget is displayed in red to alert the user that he has overspent beyond the set budget.
Shown below is an example of an overspent budget:
When setting a new Budget, existence of a duplicate budget is checked through a sequence of checks.
The activity diagram below shows the activity diagram of setting a new budget:
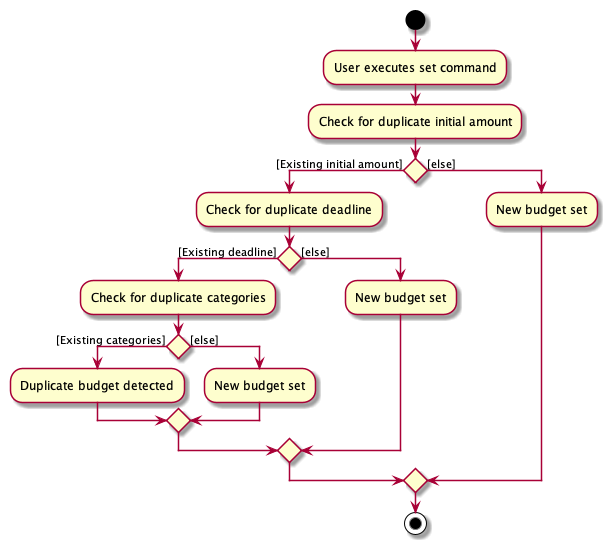
As shown, a new budget cannot have the same initalAmount, deadline and categories as any other existing budget in
budget list. Allowing existence of duplicate budgets will crowd the interface of Budget tab,
which prevents the user from getting a quick overview of his budget status. Hence, a duplicate check is essential
in providing a pleasing user exp.
4.2.2. Example of Usage
Given below is an example usage of how set behaves at each step.
Step 1. The user executes set $/100 d/31122019 c/shopping to set a new budget of $100 until 31st December 2019 under the category shopping.

set $/100 d/31122019 c/shoppingStep 2. Upon executing the command, LogicManager uses MainParser#parse to parse the input from the user.
Step 3. MainParser determines which command is being executed and creates SetCommandParser to further parse the input.
Step 4. SetCommandParser parses the argument and checks if it is valid. If it is invalid, an exception is thrown.
Else, it returns a SetCommand.
Step 5. LogicManager uses SetCommand#execute() to add a new budget.
SetCommand uses ModelManager#has(Budget) to check if it is a duplicate of an existing budget
in the UniqueBudgetList as shown above in the above diagram.
Step 6. SetCommand uses Model#commitUserState() to save the latest state of the application. It then
returns a CommandResult to the LogicManager and the result will be displayed to the user at the end.
4.2.3. Design Considerations
Currently, Budget does not extend from Transaction although the two behave in a similar way.
There is an aggregation between Budget and Transaction as the two can exist independent of each other,
although an effect on one may also cause an impact on the other.
The current design was chosen over the former design of inheritance as there is a stark difference in the two
in a way that Budget does not affect the balance of the user’s bank account directly while Transaction does.
Hence, by Liskov Substitution Principle, inheritance is not a suitable design.
4.3. Split Feature: split
This feature allows the user to pay for a certain item or make a transaction on behalf of his friends. Refer to the UserGuide for usage details.
4.3.1. Current Implementation
The split command is an abstraction of LendMoney class.
Given a list of shares and people, each person is assigned an amount based on the corresponding positional share and the total amount given to split command.
A LendMoney instance is created for each person and executed.
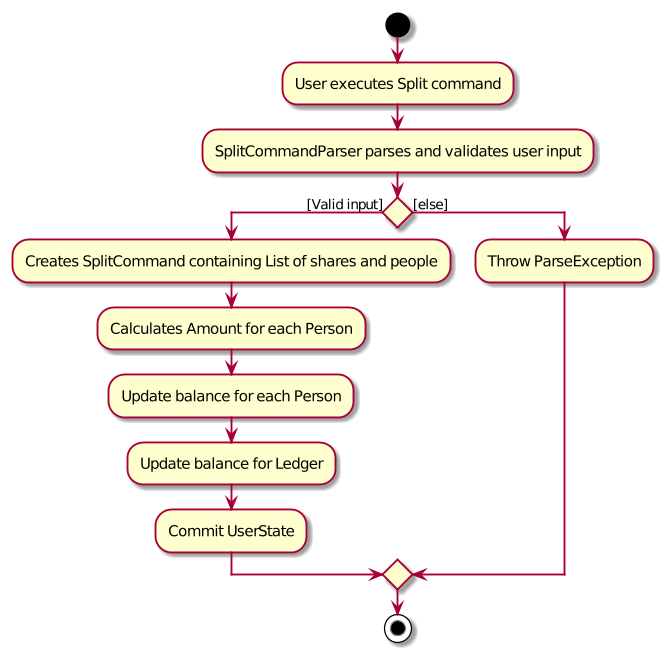
Below shows how a typical command from the user is executed by the program.

SplitCommandStep 1: User enters split $/200 n/a n/b n/c a/desc into the command line to split $200 among a, b and c.
Step 2: Upon executing the command, LogicManager uses MainParser#parse() to parse the input from the user.
Step 3: MainParser determines that user input is an instance of a SplitCommand and creates a SplitCommandParser
to further parse the input.
Step 4: SplitCommandParser parses the command and checks if fields like amount and names are valid.
If all fields are valid, it returns a SplitCommand. Else, an error is thrown to the result box and the execution
terminates.
Step 5: LogicManager uses SplitCommand#execute() to update the balances of Ledger and people involved in the
transaction.
Step 6: SplitCommand#execute() calls Model#add() to add the user input into the user history.
Within the function call, the actual update of balances is handled in Ledger#handleOperation().
Step 7: SplitCommand calls Model#commitUserState() after executing to save the latest state of the application.
Step 8: A CommandResult is then returned to the LogicManager which is then displayed to the user.
Split Object4.3.2. Design Considerations
Below shows how the classes involved with Ledger interact with each other.
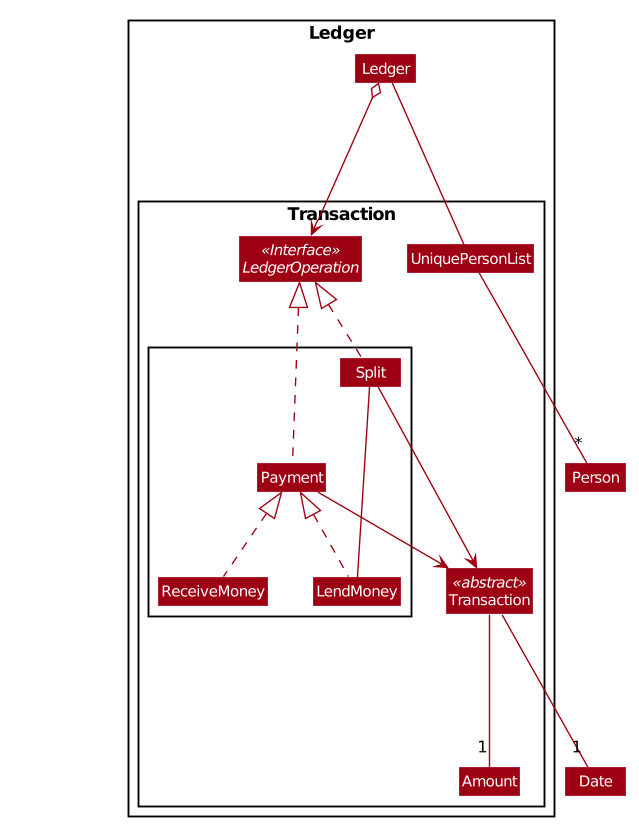
Current implementation of Split class encourages code reuse by abstracting the delegating the task of rebalancing to another class.
However, this introduces coupling as the behavior of Split is now inexplicably tied to LendMoney.
4.4. Settle Up Feature: receive
This feature allows another person to send money to the user.
The balance in the Ledger and the balance of the sender is updated accordingly.
4.4.1. Current Implementation
The receive command creates ReceiveMoney class that handles the transfer of fund from another person to the user.
How receive relates to the rest of the Ledger classes can be inferred from the
class diagram above.
In the handleBalance method of ReceiveMoney, it will find the correct person in the Ledger by name,
or create a new Person with given name if it is not already in the Ledger.
Balance of the user and the sender is then updated accordingly.
Below is an example usage scenario for how receive would behave.
Step 1: User enters receive $/200 n/a into the command line to settle up $200 from a.
Step 2: Upon executing the command, LogicManager uses MainParser#parse() to parse the input from the user.
Step 3: MainParser determines that user input is an instance of a ReceiveCommand and creates a ReceiveCommandParser
to further parse the input.
Step 4: ReceiveCommandParser parses the command and checks if fields like amount and names are valid.
If all fields are valid, it returns a ReceiveCommand. Else, an error is thrown to the result box and the execution
terminates.
Step 5: LogicManager uses ReceiveCommand#execute() to update the balances of Ledger and the person in the
transaction.
Step 6: ReceiveCommand#execute() calls Model#add() to add the user input into the user history.
Within the function call, the person in Ledger is found and his/her outstanding balance is updated in Ledger#handleOperation().
If he is not already inside the Ledger, a new Person is created with the same name.
Step 7: SplitCommand calls Model#commitUserState() after executing to save the latest state of the application.
Step 8: A CommandResult is then returned to the LogicManager which is then displayed to the user.
handleBalance in ReceiveMoneypublic class ReceiveMoney extends Payment {
@Override
public Amount handleBalance(Amount balance, UniquePersonList peopleInLedger) {
Person target = super.handleTarget(peopleInLedger);
target.spend(amount);
return balance.addAmount(amount);
}
}
public abstract class Payment extends Transaction implements LedgerOperations {
protected Person handleTarget(UniquePersonList peopleInLedger) {
Person personInvolved = person;
if (peopleInLedger.contains(person)) {
personInvolved = peopleInLedger.get(person).get();
} else {
peopleInLedger.add(person);
}
return personInvolved;
}
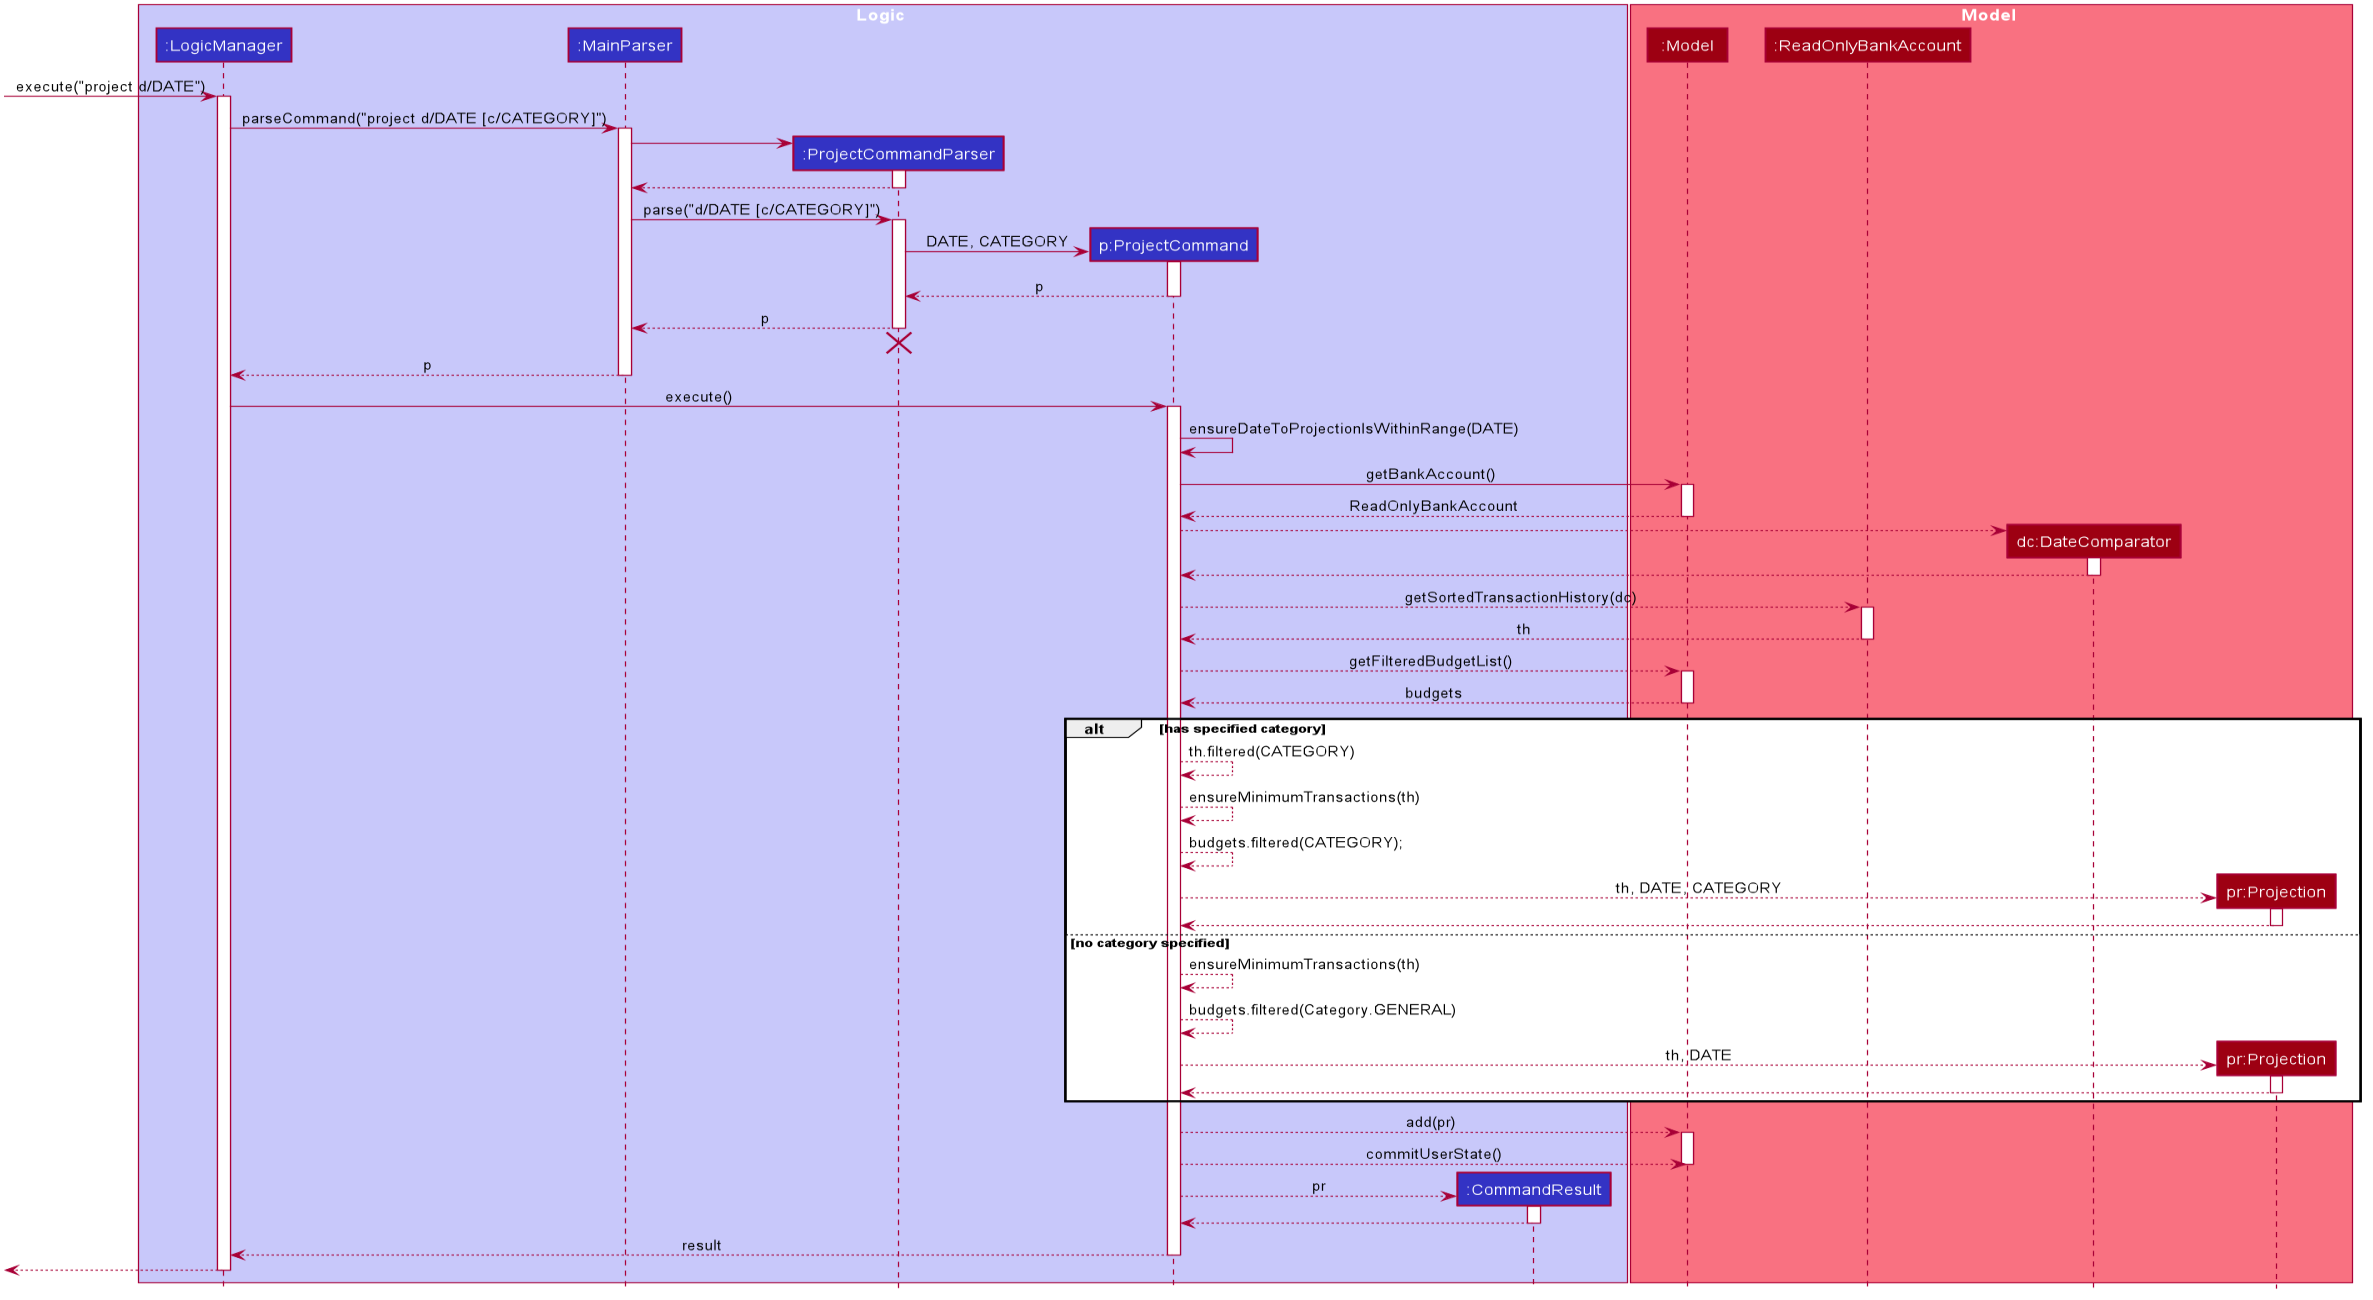
}4.5. Project Feature: project
This feature allows users to project their balance amount and budget statuses based on past income and outflows as manifest in their
TransactionHistory by using the command project DATE [CATEGORY].
4.5.1. Current Implementation
The project command is facilitated by the Logic and Model components of the application, PalPay.
The sequence diagram below demonstrates how the project DATE [CATEGORY] command is handled by the application.
If a CATEGORY is not specified by the user, it will be set as GENERAL by default.
Projection by Date
When projecting by date alone, all transactions in the user's transaction list will be taken into account,
regardless of their categories. On the other hand, only budgets without categories (thus belonging to the
GENERAL category by default) will be projected upon.
Projection by Date and Category
When projecting by date and category, all transactions tagged by the specified category will be taken into account. Similarly, all budgets tagged with the specified category will be projected upon.
Budget Projections
Projections on budgets are made by first projecting the user's balance amount at the point when the budget was set. Then, it compares the user's projected balance amount at the point of the budget’s deadline, with the budget’s amount. A surplus is indicated when the former is greater than the latter, and a deficit is indicated when the former is smaller than the latter. Given below is an example usage scenario and how the project command executes at each step.
Step 1. The user launches the application.
Step 2. If the user does not have at least 5 transactions, he / she adds transactions until
there are sufficient transactions to project upon. Then, the user executes the project command.
Step 3. Upon executing the command, LogicManager uses MainParser#parse() to parse the input from the user.
Step 4. MainParser determines which command is being used and creates ProjectCommandParser to further parse
the input from the user.
Step 5. ProjectCommandParser parses the argument and checks if a valid date and category was provided.
-
If an invalid date or category was provided, or if no date was provided,
ProjectCommandParserthrows an exception and terminates. -
Otherwise, it returns a
ProjectCommand, which contains aDateand possibly aCategoryspecified by the user.
Step 6. LogicManager uses ProjectCommand#execute() to project the user’s balance and budget states at the time
of the specified Date.
Step 7. ProjectCommand uses Model#commitUserState() to save the latest state of the application. It then
returns a CommandResult to the LogicManager and the result will be displayed to the user at the end.
Activity Diagram
The activity diagram below depicts how a projection is made.
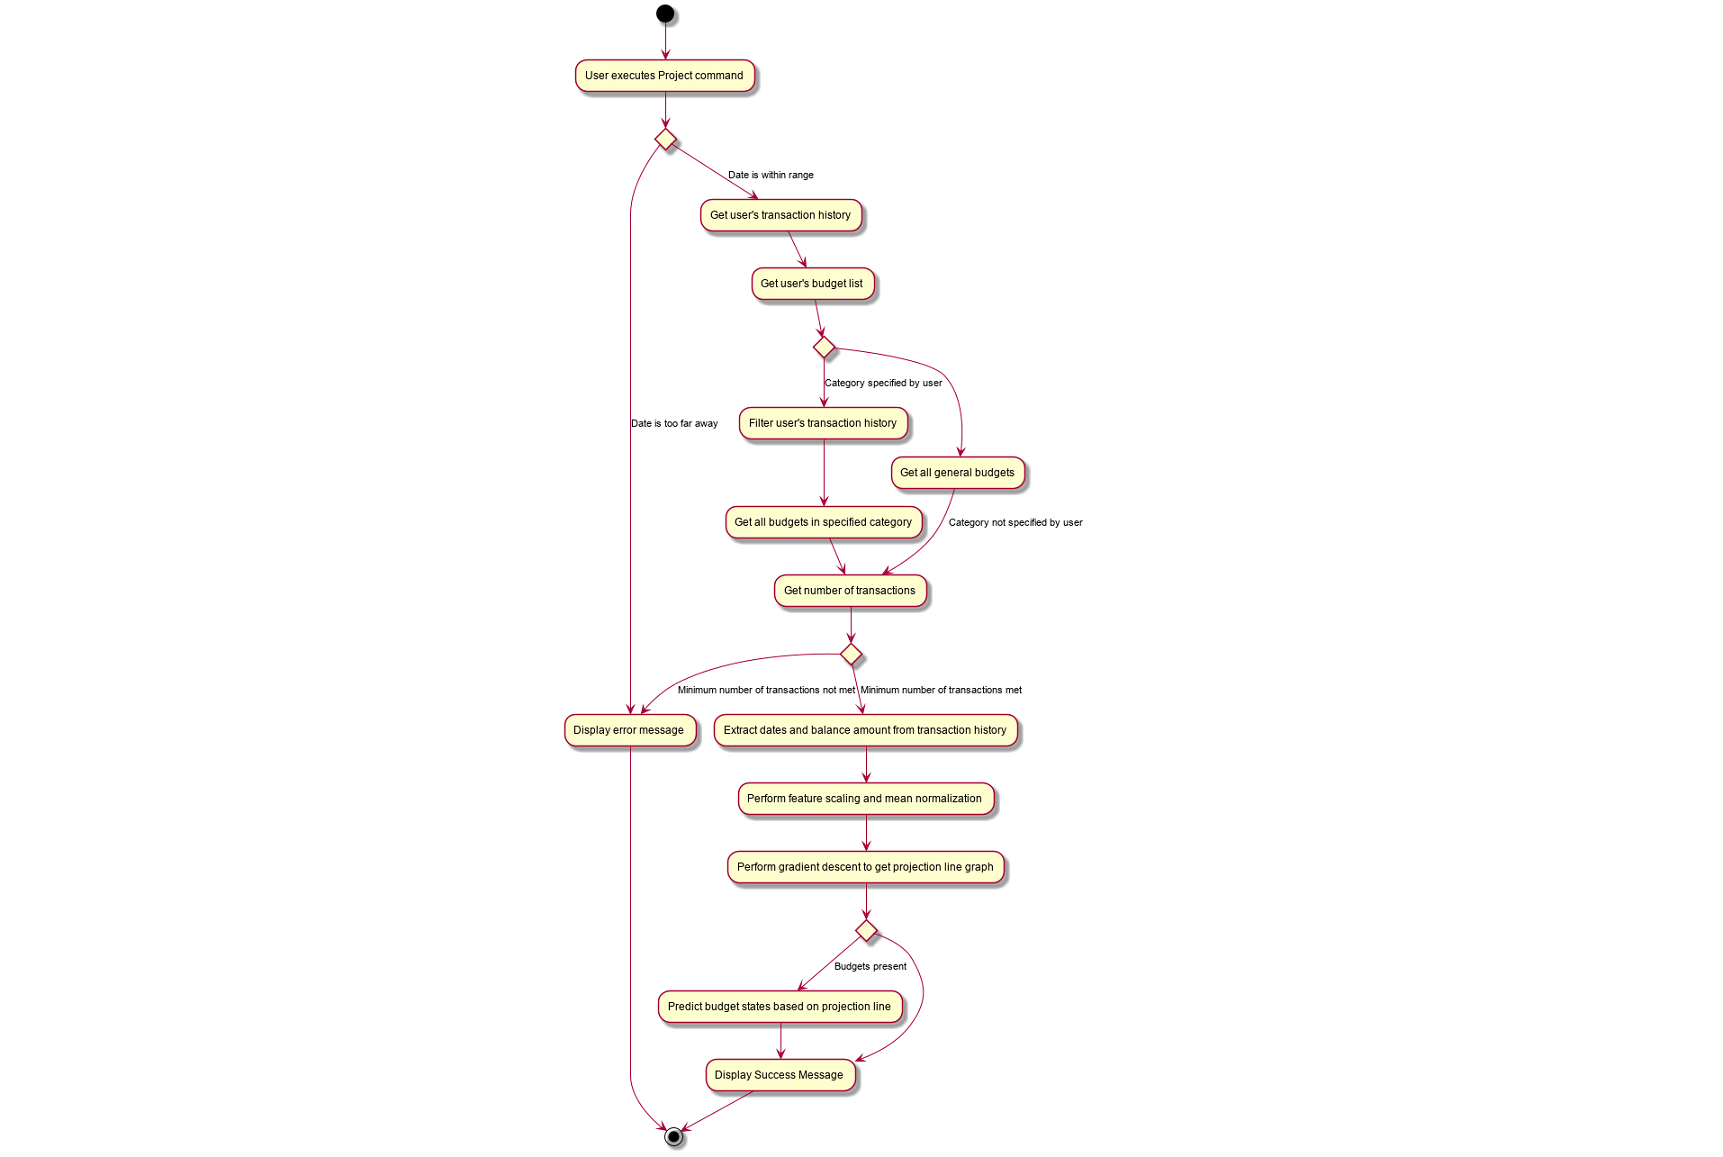
Graphical Representation
A graphical representation of the user's projections may be rendered using the display command.
4.5.2. Future Enhancements
Polynomial Regression
For simplicity of logic and design, the current implementation performs linear regression (via gradient descent),
projecting user balance and budget states using a best-fit straight line. Ultimately, income and spending trends
may not be best represented by a straight line, but rather by a polynomial equation. In future updates, the projection
feature will choose a value, n, and perform a n-th degree polynomial regression, such that the user’s balance
and budget states can be more accurately projected.
| Currently, the GradientDescent class implements feature scaling and mean normalisation. Although this is not entirely necessary for the current implementation (which uses linear regression), it is meant for optimizing polynomial regression in future updates. |
Normal Equation
Currently, the gradient descent algorithm is used to plot the projection graph, which is used for predicting the user's balance and budget states at specified point in time. For smaller data sets, analytically computing the normal equation to find the best-fit line graph may have result in a faster runtime. In future updates, the normal equation method will be used in place of the gradient descent algorithm, for projections with less than a set number (e.g. 500) of transactions.
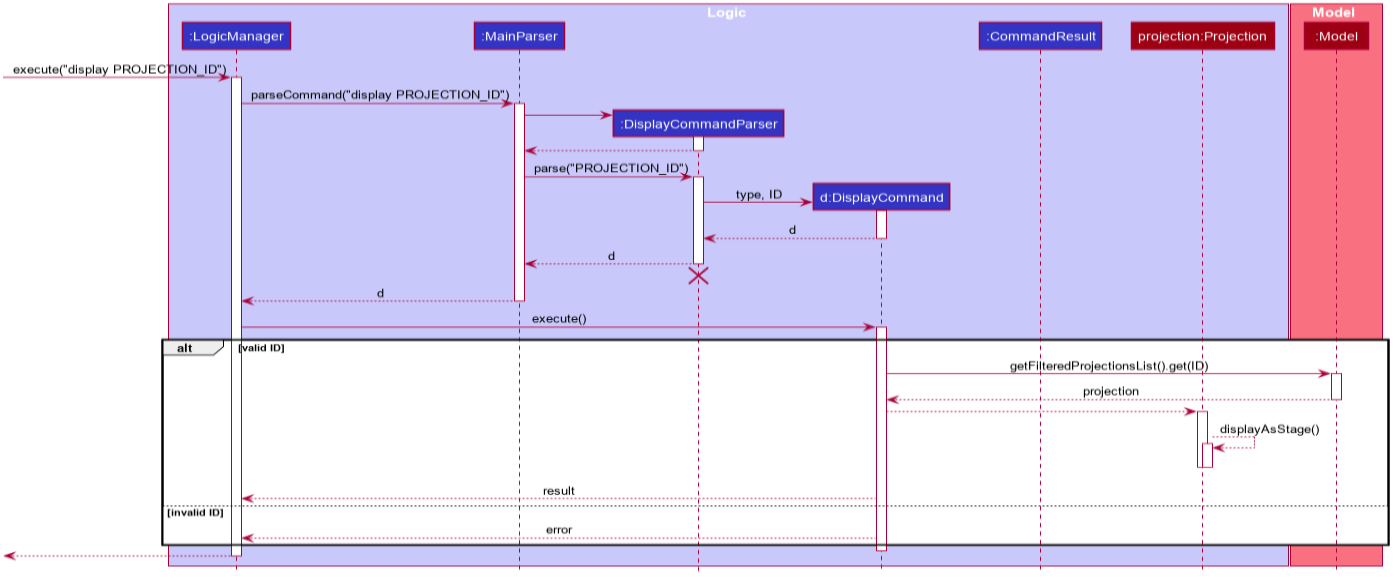
4.6. Display Feature: display
This feature provides a graphical view of an existing projection to the user.
4.6.1. Current Implementation
Given below is an example usage scenario and how the display command executes at each step.
Step 1. The user launches the application.
Step 2. If the user does not have any existing projections, he / she creates one or more projections.
Then, the user executes the display command.
Step 3. Upon executing the command, LogicManager uses MainParser#parse() to parse the input from the user.
Step 4. MainParser determines which command is being used and creates DisplayCommandParser to further parse
the input from the user.
Step 5. DisplayCommandParser parses the argument and checks if a valid type and index was provided.
-
If an invalid type or index was provided, or if no type or index was provided,
DisplayCommandParserthrows an exception and terminates. -
Otherwise, it returns a
DisplayCommand, which contains aTypeand anIndexspecified by the user.
Step 6. LogicManager uses ProjectCommand#execute() to display the specified projection in a
new window.
Step 7. DisplayCommand returns a CommandResult to the LogicManager and the result will be displayed to the user at the end.
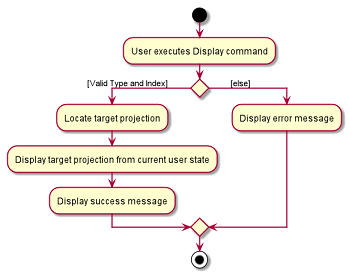
The following activity diagram depicts how the display command is executed.
For a more concrete illustration of how the display command is handled by PalPay,
a sequence diagram is provided below.
4.7. View Feature: view
This feature allows the user to switch between the different tabs of the application.
4.7.1. Current Implementation
The view command is facilitated by the MainWindow, MainTabPanel, ViewCommandParser and ViewCommand.
Given below is an example usage of how view behaves at each step.
Step 1. The user launches the application and views the transaction tab.
Step 2. The user now executes view budget to switch to the budget tab.
Step 3. Upon executing the command, LogicManager uses MainParser#parse() to parse the input from the user.
Step 4. MainParser determines which command is being used and creates ViewCommandParser to further parse the input
from the user.
Step 5. ViewCommandParser parses the argument and checks if it is valid. If it is
invalid, ViewCommandParser throws an exception and terminates. Else, it returns a ViewCommand that contains a Tab.
Step 6. LogicManager uses ViewCommand#execute() to switch to the budget tab.
Step 7. ViewCommand returns a CommandResult to the LogicManager with the Tab. LogicManager then
returns the CommandResult to MainWindow.
Step 8. MainWindow checks if there is a need to switch Tab. If there is, MainWindow uses
MainWindow#handleSwitchTab() to switch tab. Else, MainWindow does nothing.
The following activity diagram shows the flow of the view command.
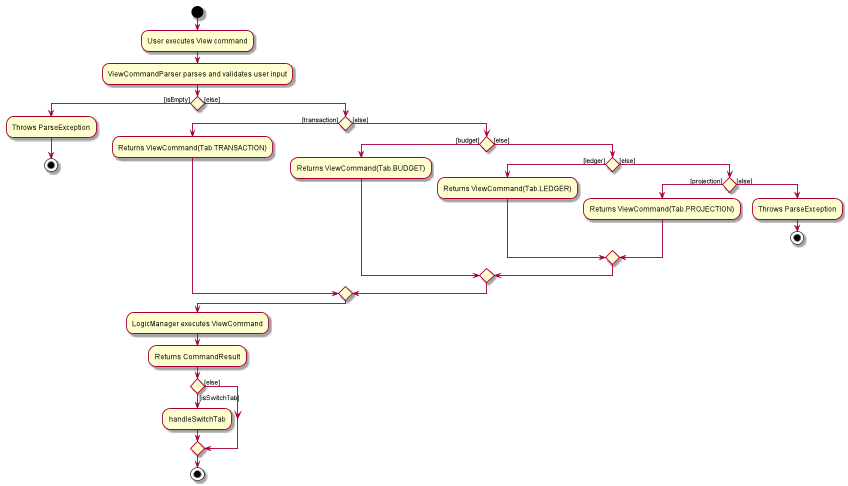
View4.8. Delete Transaction Feature: delete
This feature allows the user to delete an existing transaction, budget, ledger or projection entry from their respective lists.
4.8.1. Current Implementation
-
The delete feature is facilitated by the Logic and Model components of the application.
-
The delete feature works for
Transaction,Budget,LedgerandProjectionentries.
Given below is an example usage of how delete behaves at each step.
Step 1. The user executes delete t1 to delete the first entry from the transaction list.
Step 2. Upon executing the command, LogicManager uses MainParser#parse to parse this input from the user.
Step 3. MainParser determines which command is being executed and creates DeleteCommandParser to further parse the input.
Step 4. DeleteCommandParser parses the argument and checks the validity of arguments. If it is invalid, an exception is thrown.
Else, it returns a DeleteCommand.
Step 5. LogicManager uses DeleteCommand#execute() to delete either the Transaction, Budget, Ledger or Projection from their respective unique lists.
Step 6. DeleteCommand uses Model#commitUserState() to save the latest state of the application. It then
returns a CommandResult to the LogicManager and the result will be displayed to the user.
-
The following activity diagram summarizes what happens when a user executes a
deletecommand:
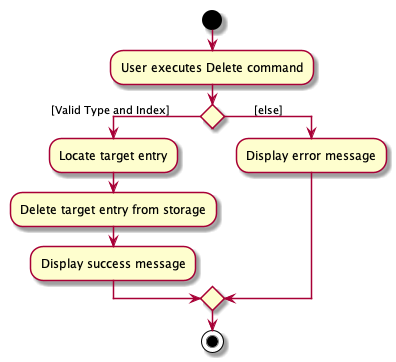
delete command4.8.2. Design Consideration
-
The
deletekeyword is followed by aTYPE+INDEXparameter.-
Transactionentries takes intas itsTYPEparameter. -
Budgetentries takes inbas itsTYPEparameter. -
Ledgerentries takes inlas itsTYPEparameter. -
Projectionentries takes inpas itsTYPEparameter.
-
-
The
indexparameter refers to the entry number within theTYPEentry’s view tab. -
Example:
delete t5deletes the 5th entry from the list of transactions if that particular entry exists.
Aspect: Delete requires TYPE+INDEX as one of its parameter
-
Alternative 1 (current choice): takes in
TYPE+INDEXto decide whether to delete an item from Transaction, Budget, Ledger or Projection list. (e.g.delete b1deletes item index 1 from budget).-
Pros: Requires lesser user steps to be taken before executing a
deletecommand. -
Cons: Requires four unique lists to be created instead of 1. (e.g. the
UniqueTransactionListstores Transaction items and theUniqueBudgetListto store Budget items). -
For example, when a new command is executed, we must remember to delete both
HistoryManagerandVersionedAddressBook.
-
-
Alternative 2: Change to Transaction, Budget, Ledger or Projection mode and keying in only index (e.g.
delete 1)-
Pros: Requires only one unique list required to store all operation types.
-
Cons: Requires additional user step to switch between modes before executing a updating command.
-
4.9. Update Existing Entry Feature: update
This feature currently allows users to update Transaction or Budget entries. The user is unable to perform this feature on Ledger operations. The rationale for this will be further explained in Section 4.9.2.2, “Aspect 2: Update can not edit Ledger Operations”. The user is currently unable to perform this feature on Projection operations as it will be further implemented in future updates.
4.9.1. Current Implementation
-
The update feature is facilitated by the Logic and Model components of the application.
-
The parameter requirements differs for the type of entry:
-
Transactiontype requires at least one of it’sAmount,Description,DateorCategoryfields to be updated. -
Budgettype requires at least one of it’sAmount,DateorCategoryfields to be updated. -
Projecttype requires it’sDateandCategoryfields to be updated (Future implementation).
-
-
At least one valid parameter must be changed when executing an
updatecommand. (i.e.update b1will result in an error as no fields are being changed).
Step 1. The user executes update t2 $/200 to update the second entry’s amount, from the transaction list, to $200 .
Step 2. Upon executing the command, LogicManager uses MainParser#parse to parse this input from the user.
Step 3. MainParser determines which command is being executed and creates UpdateCommandParser to further parse the input.
Step 4. UpdateCommandParser parses the argument and checks the validity of arguments. If it is invalid, an exception is thrown.
Else, it returns a UpdateCommand.
Step 5. LogicManager uses UpdateCommand#execute() to update either the Transaction or Budget from their respective unique lists.
Step 6. UpdateCommand#execute() uses the UpdateTransactionDescriptor class to create a new instance of a transaction or budget with the appended variables.
Step 7. Model from UpdateCommand then changes the necessary fields of this entry.
Step 8. UpdateCommand uses Model#commitUserState() to save the latest state of the application. It then
returns a CommandResult to the LogicManager and the result will be displayed to the user.
-
The following activity diagram summarizes what happens when a user executes an update command:
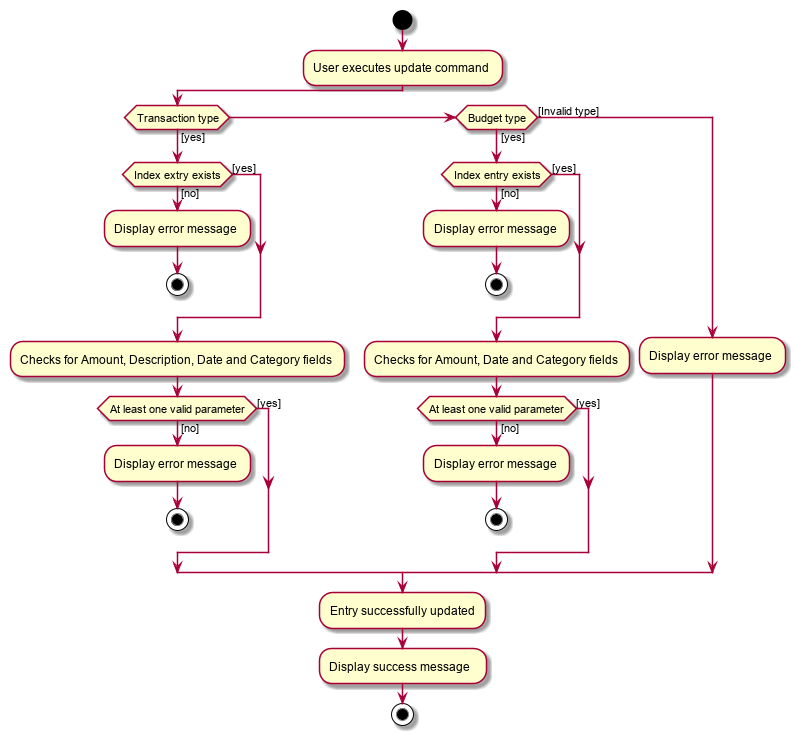
update4.9.2. Design Considerations
The update feature allows one or more fields of a Transaction or Budget to be updated. (e.g. update t1 $/2 and update t1 $/2 d/10102019 will both work as intended).
More often than not, users do not need to change an entire Transaction or Budget entry. This will minimize inputs from users if they do not require every single parameters of a Transaction or Budget to be changed.
Aspect 1: Update requires TYPE+INDEX as one of its parameter
-
Alternative 1 (current choice): takes in
TYPE+INDEXto decide whether to update an item from Transaction, Budget or Projection list. (e.g.delete b1deletes item index 1 from budget).-
Pros: Requires lesser user steps to be taken before executing an
updatecommand. -
Cons: Requires 2 unique lists to be utilized instead of 1. (e.g. the
UniqueTransactionListstores Transaction items and theUniqueBudgetListto store Budget items). -
For example, when a new command is executed, we must remember to update both
HistoryManagerandVersionedAddressBook.
-
-
Alternative 2: Change to Transaction, Budget or Projection mode and keying in only index (e.g.
update 1 ..).-
Pros: Requires only one unique list required to store all operation types.
-
Cons: Requires additional user step to switch between modes before executing a updating command.
-
Aspect 2: Update can not edit Ledger Operations
-
Alternative 1 (current choice): Update Command does not work with
Ledgeroperations.-
Pros: Intuitive implementation and execution for the user.
-
Cons: Requires excessive user operations.
-
The user has to first delete the
Ledgeroperation that he/she wishes to change, followed by inputting theLedgeroperation with the amended fields back into PalPay.
-
-
-
Alternative 2: Update Command to also work with
Ledgeroperations.-
Pros: Requires only one user command to append or change
Ledgerentries. -
Cons: Results in convoluted implementation and user experience. This will also hinder future permeability of the
Splitfeature.-
Ledgeroperations such assplitincludes many repeated fields (i.e. multiplePersonsandshareslist). -
Will require several conditional user inputs to differentiate between the various repeated entities that the user wishes to amend.
-
-
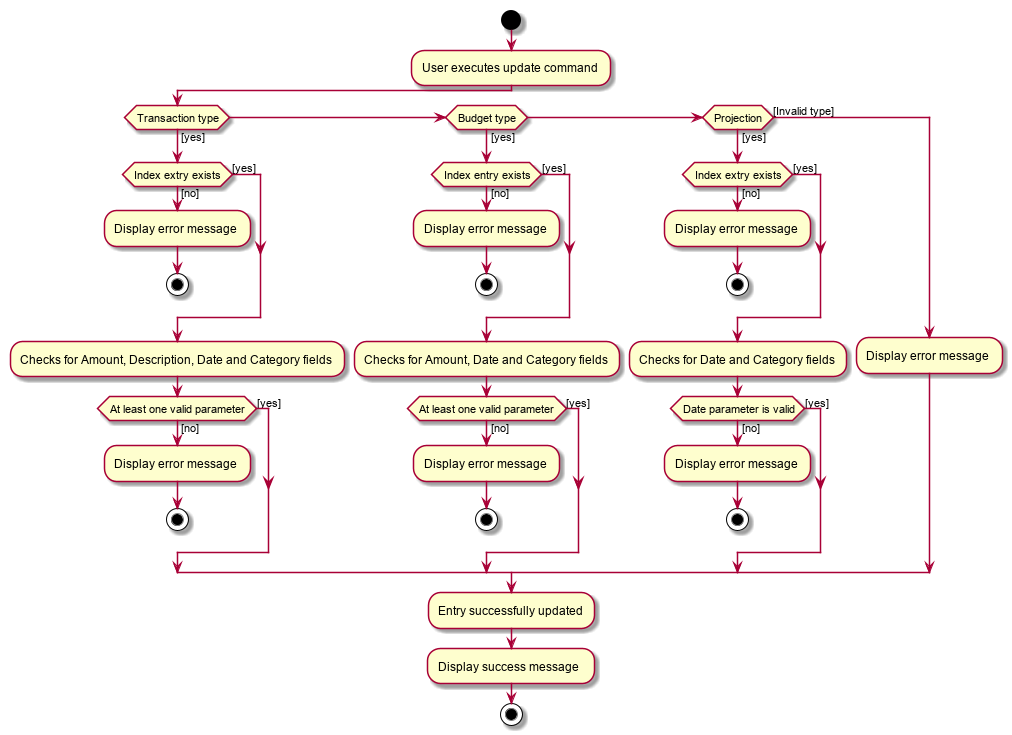
4.9.3. Future Enhancements
Update feature for Projections
Currently the update feature has not been implemented for Projection operations. In future iterations of PalPay, the update feature should work seamlessly with Projection operations, similar to that of Transaction and Budget operations
The activity diagram below will provide a visual representation of the possible user routes using the update command after this enhancement has been implemented.
update4.10. Sort Feature: sort
This feature allows the user to sort their transactions by amount or date, in ascending and descending order.
4.10.1. Current Implementation
The sort command is facilitated by the Logic and Model components of the application.
The following sequence diagram shows how the sorting of transactions work when the user enters sort date/d.
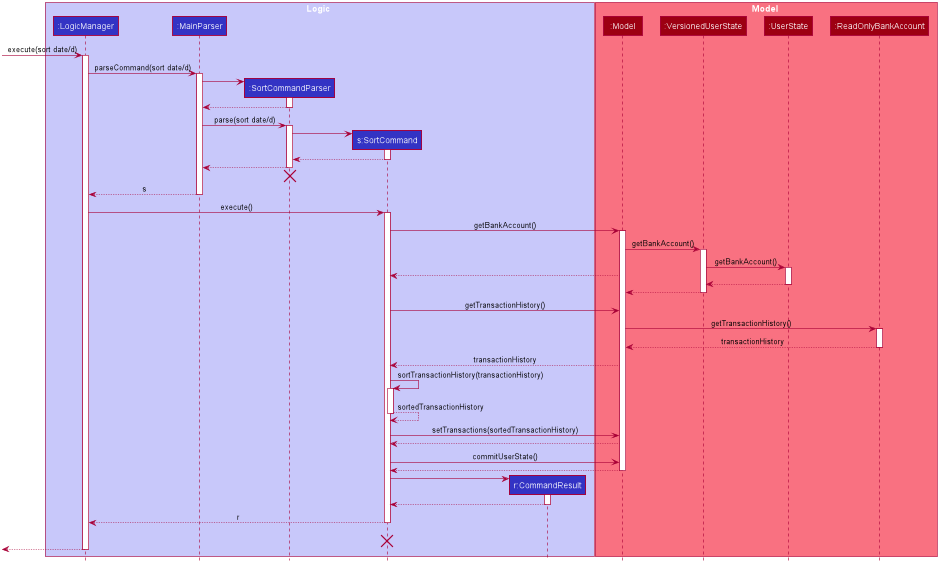
sort date/d4.10.2. Example of Usage
Given below is an example usage of how sort behaves at each step.
Step 1. The user launches the application and views an unsorted list of transactions.

Step 2. The user now executes sort date/d to sort the transactions in the order of descending date.

sort date/dStep 3. Upon executing the command, LogicManager uses MainParser#parse() to parse the input from the user.
Step 4. MainParser determines which command is being used and creates SortCommandParser to further parse the input
from the user.
Step 5. SortCommandParser parses the argument and checks if it is valid. If it is
invalid, SortCommandParser throws an exception and terminates. Else, it returns a SortCommand.
Step 6. LogicManager uses SortCommand#execute() to sort the transactions in the order of descending date.
Step 7. SortCommand uses ModelManager#getBankAccount() to get the current bank account and uses
BankAccount#getTransactionHistory() to get the list of transactions of the user.
Step 8. SortCommand uses SortCommand#sortTransactionHistory() to sort the transactions.
Step 9. SortCommand uses Model#set() to store the sorted transactions and Model#commitUserState() to
save the latest state of the application.
Step 10. SortCommand returns a CommandResult to the LogicManager and the result will be displayed to the user
at the end.

4.10.3. Design Considerations
Aspect: Sorting of the Bank Account
-
Alternative 1 (Current Choice): Creating a comparator for each area to be sorted.
-
Pros: Easy to implement.
-
Cons: Users can only sort by comparators that have been implemented. Developers have to create a new comparator class to sort a new area.
-
-
Alternative 2: Users can define the area to be sorted.
-
Pros: Extremely flexible for the users as they are not limited to the number of areas to be sorted.
-
Cons: Difficult to implement.
-
4.11. Filter Feature: filter
This feature allows the user to filter the list of transactions by category, description, month and/or year.
4.11.1. Overview
The FilterCommandParser implements Parser with the following operation:
-
FilterCommandParser#parse(): This operation will take in at least oneStringinput from the user that represents different fields delimited by a whitespace. All transactions that contains all fields will be displayed in the transaction tab.
4.11.2. Current Implementation
The filter command is facilitated by the FilterCommandParser and FilterCommand of the application.
PalPay filters the list of transactions by checking if the specified fields exist in the transaction.
For instance, the command filter c/breakfast m/11 y/2019 would display a list of transactions that were made during
breakfast in November 2019.
The following class diagram depicts the relations of the FilterCommand, FilterCommandParser and its related classes.

FilterGiven below is an example usage scenario and how the filter mechanism behaves at each step.
Step 1. The user launches the application and views an unfiltered list of transactions.
Step 2. The user now executes filter c/breakfast m/11 y/2019 to filter the list of transactions.
Step 3. Upon executing the command, LogicManager uses MainParser#parse() to parse the input from the user.
Step 4. MainParser determines which command is being used and creates FilterCommandParser to further parse
the input from the user.
Step 5. FilterCommandParser parses the argument and checks if category, description, month or year exists.
If all field are not present, FilterCommandParser throws an exception and terminates, as depicted in the following
activity diagram.
Else, it returns a FilterCommand that contains a TransactionPredicate.
Step 6. LogicManager uses FilterCommand#execute() to update the list of transactions that satisfies the
given TransactionPredicate.
Step 7. FilterCommand uses Model#commitUserState() to save the latest state of the application. It then
returns a CommandResult to the LogicManager and the result will be displayed to the user at the end.
Below is an activity diagram shows the process of invoking the filter command.
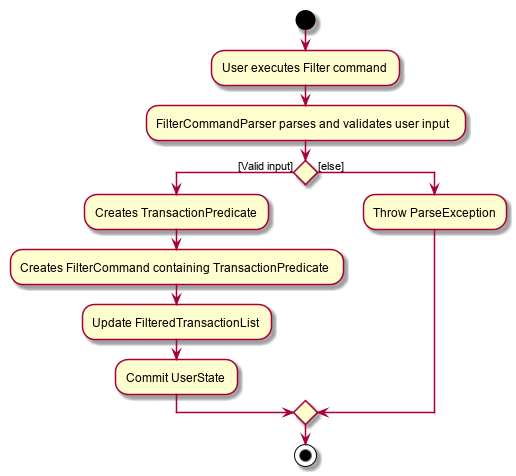
Filter4.12. Undo / Redo Command Feature: undo/redo
4.12.1. Current Implementation
The undo/redo mechanism is facilitated by VersionedUserState.
It extends UserState with an undo/redo history, stored internally as an userStateList and currentStatePointer.
Additionally, it implements the following operations:
-
VersionedUserState#commit()— Saves the current user state in its history. -
VersionedUserState#undo()— Restores the previous user state from its history. -
VersionedUserState#redo()— Restores a previously undone user state from its history.
These operations are exposed in the Model interface as Model#commitUserState(), Model#undoUserState()
and Model#redoUserState() respectively.
Given below is an example usage scenario and how the undo/redo mechanism behaves at each step.
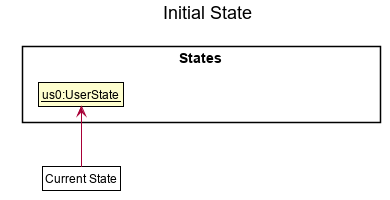
Step 1. The user launches the application for the first time.
The VersionedUserState will be initialized with the initial user state, and the currentStatePointer
pointing to that single user state.
Step 2. The user executes delete t5 command to delete the 5th transaction in the transaction list.
The delete command calls Model#commitUserState(), causing the modified state of the user state after the
delete t5 command executes to be saved in the userStateList, and the currentStatePointer is shifted
to the newly inserted user state.

delete t1 CommandStep 3. The user executes in $/10 n/Allowance d/07112019 to log a new transaction.
The in command also calls Model#commitUserState(), causing another modified user state to be saved
into the userStateList.
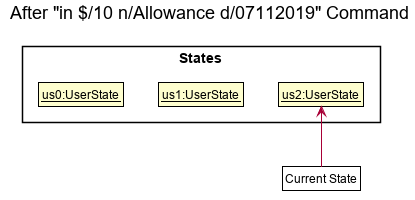
in $/10 n/Allowance d/07112019 Command
If a command fails its execution, it will not call Model#commitUserState(), so the user state will
not be saved into the userStateList.
|
Step 4. The user now decides that logging the transaction was a mistake, and decides to undo that action by
executing the undo command. The undo command will call Model#undoUserState(), which will shift the
currentStatePointer once to the left, pointing it to the previous user state, and restores the user state
to that state.

undo Command
If the currentStatePointer is at index 0, pointing to the initial user state, then there are no previous
user states to restore. The undo command uses Model#canUndoUserState() to check if this is the case.
If so, it will return an error to the user rather than attempting to perform the undo.
|
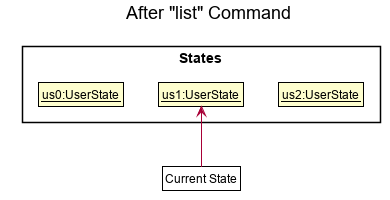
Step 5. The user then decides to execute the command list.
Commands that do not modify the user state, such as list, will usually not call Model#commitUserState(),
Model#undoUserState() or Model#redoUserState(). Thus, the userStateList remains unchanged.
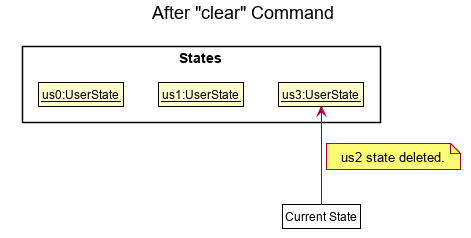
list CommandStep 6. The user executes clear, which calls Model#commitUserState().
Since the currentStatePointer is not pointing at the end of the userStateList, all user states after
the currentStatePointer will be purged. We designed it this way because it no longer makes sense to redo the
in $/10 n/Allowance d/07112019 command. This is the behavior that most modern desktop applications follow.
clear CommandThe following sequence diagram shows how the undo operation works:
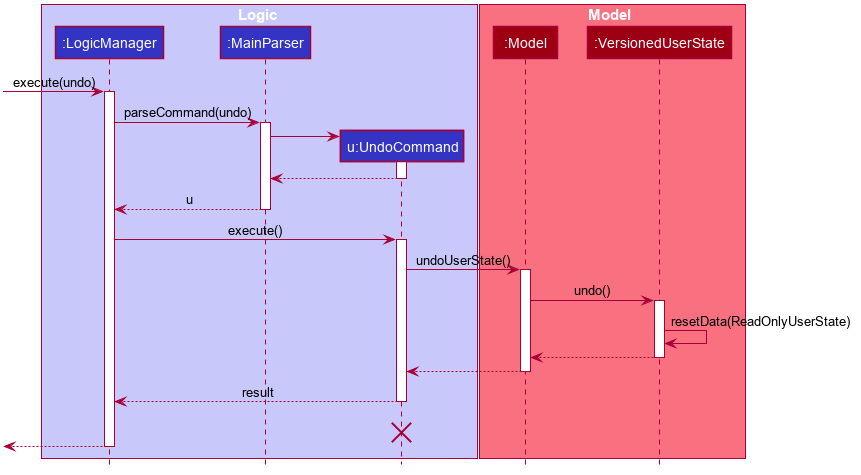
The lifeline for UndoCommand should end at the destroy marker (X) but due to a limitation of PlantUML,
the lifeline reaches the end of diagram.
|
The redo command does the opposite — it calls Model#redoUserState(), which shifts the currentStatePointer
once to the right, pointing to the previously undone state, and restores the user state to that state.
If the currentStatePointer is at index userStateList.size() - 1, pointing to the latest user state, then
there are no undone user states to restore. The redo command uses Model#canRedoUserState() to
check if this is the case. If so, it will return an error to the user rather than attempting to perform the redo.
|
Aspect: How Undo and Redo Executes
-
Alternative 1 (current choice): Saves the entire user state.
-
Pros: Easy to implement.
-
Cons: May have performance issues in terms of memory usage.
-
-
Alternative 2: Individual command knows how to undo/redo by itself.
-
Pros: Will use less memory (e.g. for
delete t1, just save the transaction being deleted). -
Cons: We must ensure that the implementation of each individual command are correct.
-
Aspect: Which Data Structure to Support the Undo/Redo Commands
-
Alternative 1 (current choice): Use a list and a pointer to store the history of user states.
-
Pros: Easy for new Computer Science student undergraduates to understand, who are likely to be the new incoming developers of our project.
-
Cons: Need to manage the list and pointer carefully as the pointer has to point to the correct position in the list at all times. For example, when a new command is executed, we must remember to update both
userStateListandcurrentStatePointer.
-
-
Alternative 2: Use two stacks. One stack stores the commands to undo and the other stores the commands to redo.
-
Pros: Do not need to manage a pointer for the stacks.
-
Cons: Need to manage both stacks carefully. For instance, when a command is popped from the undo stack, it needs to be pushed into the redo stack.
-
4.13. Logging
We are using java.util.logging package for logging.
The LogsCenter class is used to manage the logging levels and logging destinations.
-
The logging level can be controlled using the
logLevelsetting in the configuration file (See Section 4.14, “Configuration”) -
The
Loggerfor a class can be obtained usingLogsCenter.getLogger(Class)which will log messages according to the specified logging level -
Currently log messages are output through:
Consoleand to a.logfile.
Logging Levels
-
SEVERE: Critical problem detected which may possibly cause the termination of the application -
WARNING: Can continue, but with caution -
INFO: Information showing the noteworthy actions by the App -
FINE: Details that is not usually noteworthy but may be useful in debugging e.g. print the actual list instead of just its size
4.14. Configuration
Certain properties of the application can be controlled (e.g user prefs file location, logging level) through the configuration file (default: config.json).
5. Documentation
Refer to the guide here.
6. Testing
Refer to the guide here.
7. Dev Ops
Refer to the guide here.
Appendix A: Product Scope
Target user profile:
-
has a need to manage a significant number of transactions
-
prefer desktop applications over other types
-
can type fast
-
prefers typing over mouse input
-
is reasonably comfortable using CLI apps
Value proposition: manage contacts faster than a typical mouse/GUI driven app
Appendix B: User Stories
Priorities: High (must have) - * * *, Medium (nice to have) - * *, Low (unlikely to have) - *
| Priority | As a … | I want to … | So that I can… |
|---|---|---|---|
|
data-oriented person |
see an overview of my transactions in an intuitive graph |
gain insights at a glance |
|
new user |
see usage instructions |
refer to instructions when I forget how to use the App |
|
student |
input my spending into different categories |
manage my expenses better |
|
visual person |
see how much budget I have left in each category |
cut down on spending as necessary |
|
student with many friends |
split the bill with my friends |
know how much I should payment for a meal |
|
student who forgets to payment his debt on time |
be reminded to payment my debt before the deadline |
stop incurring interests |
|
patriotic Singaporean who travels to JB often |
easily calculate how much Ringgit to bring |
enjoy my holiday with insufficient money |
|
thrifty person |
see how my savings or spending will project into the future |
plan my budget |
|
user who forgets to save money |
be incentivized me to save money |
be motivated to not overspend/save money |
{More to be added}
Appendix C: Use Cases
(For all use cases below, the System is the PalPay and the Actor is the user, unless specified otherwise)
Use case: Add an income
MSS
-
User requests to add an income amount.
-
PalPay adds the income amount.
Use case ends.
Extensions
-
1a. Amount entered by the user is invalid.
-
1a1. PalPay shows an error message.
Use case resumes at step 1.
-
Use case: Delete expense
MSS
-
User requests to view spending.
-
PalPay shows the list of expenses since beginning of time.
-
User requests to delete an expense.
-
PalPay deletes the specified expense.
Use case ends.
Extensions
-
1a. User specified days passed since.
-
1a1. PalPay shows the list of expenses since the time period specified.
Use case resumes at step 3.
-
{More to be added}
Appendix D: Non Functional Requirements
-
Should work on any mainstream OS with JDK 11 or above installed.
-
A user with above average typing speed for regular English text should be able to accomplish most of the tasks faster using commands than using the mouse.
-
Upon user input, PalPay should execute tasks (and display results) within 1 second.
-
Users should have (and be able to specify) default options such that they can issue minimal commands for common tasks.
-
Should be quick and efficient, with each user session lasting no longer than 3 minutes to effectively manage his current financial state.
-
Should not make users feel defeated, but rather empowered in managing their finances.
Appendix E: Glossary
- API
-
Application Programming Interface
- Mainstream OS
-
Windows, Linux, Unix, OS-X
Appendix F: Instructions for Manual Testing
Given below are instructions to test the application manually.
| These instructions only provide a starting point for testers to work on; testers are expected to do more exploratory testing. |
F.1. Launch and Shutdown
-
Initial launch
-
Download the jar file and copy into an empty folder.
-
Double-click the jar file
Expected: Shows the GUI with a set of sample contacts. The window size may not be optimum.
-
-
Saving window preferences
-
Resize the window to an optimum size. Move the window to a different location. Close the window.
-
Re-launch the app by double-clicking the jar file.
Expected: The most recent window size and location is retained.
-
F.2. Adding an In Transaction
-
Adding an in transaction with the command:
in-
Prerequisites:
-
Test case:
in $/1000 n/Allowance d/11112019
Expected: An in transaction will be added into the list of transactions in the Transaction tab. -
Test case:
in $/0 n/Allowance d/11112019
Expected: No transaction is added. Error details will be shown in the status message. -
Other incorrect
incommands to try:in $/10.001 n/Allowance d/11112019,in $/1000 n/Allow@nce d/11112019(Contains non-alphanumeric characters).
Expected: Similar to previous.
-
F.3. Adding an Out Transaction
-
Adding an out transaction with the command:
out-
Prerequisites:
-
Test case:
out $/10 n/KFC d/11112019
Expected: An out transaction will be added into the list of transactions in the Transaction tab. -
Test case:
out $/0 n/KFC d/11112019
Expected: No transaction is added. Error details will be shown in the status message. -
Other incorrect
outcommands to try:out $/10.001 n/KFC d/11112019,out $/10 n/KFC d/32112019(Date is invalid).
Expected: Similar to previous.
-
F.4. Adding a Budget
-
Adding a budget with the command:
set-
Prerequisites:
-
Test case:
set $/1000 c/Shopping d/31122019
Expected: A budget will be added into the list of budgets in the Budget tab. -
Test case:
set $/1000 c/Shopping d/01012019
Expected: No budget is added. Error details will be shown in the status message. -
Other incorrect
setcommand to try:set $/-10 c/Shopping d/31122019(Amount is negative).
Expected: Similar to previous.
-
F.5. Adding a Split Ledger
-
Adding a split ledger with the command:
split-
Prerequisites:
-
Test case:
split $/1000 n/Amy n/Betty a/HaiDiLao
Expected: An overall ledger with 4 individual ledgers will be added into the list of ledgers in the Ledger tab. -
Test case:
split $/1000 n/Amy n/Betty
Expected: No ledger is added. Error details will be shown in the status message. -
Other incorrect
splitcommand to try:split $/1000 n/Amy n/Betty a/HaiDiLao s/1 s/2 s/3 s/4(Greater number of shares than number of people).
Expected: Similar to previous.
-
F.6. Adding a Receive Ledger
-
Adding a receive ledger with the command:
receive-
Prerequisites:
-
Test case:
receive $/20 n/Albert
Expected: An overall ledger with an individual ledger will be added into the list of ledgers in the ledger tab. -
Test case:
receive $/20 n/A|bert
Expected: No ledger is added. Error details will be shown in the status message. -
Other incorrect
receivecommand to try:receive $/20.001 n/Albert(Amount cannot have more than two decimal places).
Expected: Similar to previous.
-
F.7. Switching Tabs
-
Switching tabs with the command:
view-
Prerequisites:
-
Test case:
view budget
Expected: Switches to budget tab if user is in another tab. Else, user remains in budget tab. -
Test case:
view budg3t
Expected: Remains in current tab. Error details will be shown in the status message. -
Other incorrect
viewcommand to try:view loans(Loans tab does not exist).
Expected: Similar to previous.
-
F.8. Deleting an Entry
-
Deleting an entry with the command:
delete-
Prerequisites:
-
Test case:
delete t1
Expected: First transaction is deleted from the list. Balance in the footer will be updated. -
Test case:
delete t0
Expected: No transaction is deleted. Error details shown in the status message. Balance remains the same. -
Other incorrect
deletecommands to try:delete,delete t1000(When size of the list of transaction is smaller than 1000).
Expected: Similar to previous.
-
F.9. Updating an Entry
-
Updating an entry with the command:
update-
Prerequisites:
-
Test case:
update t1 $/1000
Expected: First transaction in the list is updated. Balance will be updated as well. -
Test case:
update t0 $/1000
Expected: No transaction is updated. Error details shown in the status message. Balance remains the same. -
Other incorrect
updatecommands to try:update,update i/Invalid(Invalid prefix).
Expected: Similar to previous.
-
F.10. Sorting the Transactions
-
Sorting the transactions with the command:
sort
Prerequisites:
-
Test case:
sort amount/a
Expected: Transaction list will be sorted from smallest amount to greatest amount. Balance remains the same. -
Test case:
sort amount
Expected: Transaction list remains unchanged. Error details shown in the status message. -
Other incorrect
sortcommands to try:sort,sort date(Order not stated).
Expected: Similar to previous.
F.11. Viewing Help Window
-
Requesting help from PalPay
-
Prerequisites: None
-
Test case:
help
Expected: A help window pops up that displays the URL of PalPay’s User Guide and aCopy URLbutton.
-
F.12. Saving Data
-
Dealing with missing/corrupted data files
-
Delete the file at
.\data\bankaccount.json.
-